石灰岩洞穴
关于本教程
本教程是免费且开源的,所有代码均使用 MIT 许可证 - 因此您可以随意使用它。 我希望您会喜欢本教程,并制作出色的游戏!
如果您喜欢这个教程并希望我继续写作,请考虑支持 我的 Patreon。

设计文档 讨论了第一个真正的地下城关卡是一个石灰岩洞穴网络。石灰岩洞穴在现实生活中非常令人惊叹;约克郡的 Gaping Gill 是我小时候最喜欢去的地方之一(您可能在*《巨蟒与圣杯》*中见过它 - Vorpal 兔子从它的入口处出现!)。涓涓细流,经过数个世纪的作用,可以雕刻出 惊人 的洞穴。洞穴主要由浅灰色岩石构成,这些岩石磨损后变得光滑且具有反射性 - 产生令人惊叹的照明效果!
作弊以帮助关卡设计
在设计新关卡时,快速简便地到达那里会很有帮助!因此,我们将引入作弊模式,让您快速导航到地下城以查看您的创作。 这将非常像我们创建的其他 UI 元素(例如库存管理),所以我们需要做的第一件事是打开 main.rs 并添加一个新的 RunState 来显示作弊菜单:
#![allow(unused)]
fn main() {
#[derive(PartialEq, Copy, Clone)]
pub enum RunState { AwaitingInput,
    ...
    ShowCheatMenu
}
}
然后,将以下内容添加到您的大型游戏状态 match 语句中:
#![allow(unused)]
fn main() {
RunState::ShowCheatMenu => {
    let result = gui::show_cheat_mode(self, ctx);
    match result {
        gui::CheatMenuResult::Cancel => newrunstate = RunState::AwaitingInput,
        gui::CheatMenuResult::NoResponse => {}
        gui::CheatMenuResult::TeleportToExit => {
            self.goto_level(1);
            self.mapgen_next_state = Some(RunState::PreRun);
            newrunstate = RunState::MapGeneration;
        }
    }
}
}
这会请求 show_cheat_mode 返回一个响应,并使用“下一关”代码(与玩家激活楼梯时相同)在用户选择 Teleport 时前进。我们尚未编写该函数和枚举,因此我们打开 gui.rs 并添加它:
#![allow(unused)]
fn main() {
#[derive(PartialEq, Copy, Clone)]
pub enum CheatMenuResult { NoResponse, Cancel, TeleportToExit }

pub fn show_cheat_mode(_gs : &mut State, ctx : &mut Rltk) -> CheatMenuResult {
    let count = 2;
    let y = (25 - (count / 2)) as i32;
    ctx.draw_box(15, y-2, 31, (count+3) as i32, RGB::named(rltk::WHITE), RGB::named(rltk::BLACK));
    ctx.print_color(18, y-2, RGB::named(rltk::YELLOW), RGB::named(rltk::BLACK), "Cheating!");
    ctx.print_color(18, y+count as i32+1, RGB::named(rltk::YELLOW), RGB::named(rltk::BLACK), "ESCAPE to cancel");

    ctx.set(17, y, RGB::named(rltk::WHITE), RGB::named(rltk::BLACK), rltk::to_cp437('('));
    ctx.set(18, y, RGB::named(rltk::YELLOW), RGB::named(rltk::BLACK), rltk::to_cp437('T'));
    ctx.set(19, y, RGB::named(rltk::WHITE), RGB::named(rltk::BLACK), rltk::to_cp437(')'));

    ctx.print(21, y, "Teleport to exit");

    match ctx.key {
        None => CheatMenuResult::NoResponse,
        Some(key) => {
            match key {
                VirtualKeyCode::T => CheatMenuResult::TeleportToExit,
                VirtualKeyCode::Escape => CheatMenuResult::Cancel,
                _ => CheatMenuResult::NoResponse
            }
        }
    }
}
}
这应该看起来很熟悉:它显示一个作弊菜单,并提供字母 T 表示“传送至出口”。
最后,我们需要在 player.rs 中添加一个输入:
#![allow(unused)]
fn main() {
// 保存并退出
VirtualKeyCode::Escape => return RunState::SaveGame,

// 作弊!
VirtualKeyCode::Backslash => return RunState::ShowCheatMenu,
}
就这样! 如果您现在 cargo run,您可以按 \ (反斜杠) 和 T - 并直接传送到下一关。 这将使我们的关卡设计变得容易得多!

雕刻洞穴
我们将对石灰岩洞穴进行另一次自定义设计,因此打开 map_builders/mod.rs 并找到 level_builder(它应该在文件的末尾):
#![allow(unused)]
fn main() {
pub fn level_builder(new_depth: i32, rng: &mut rltk::RandomNumberGenerator, width: i32, height: i32) -> BuilderChain {
    rltk::console::log(format!("Depth: {}", new_depth));
    match new_depth {
        1 => town_builder(new_depth, rng, width, height),
        2 => forest_builder(new_depth, rng, width, height),
        3 => limestone_cavern_builder(new_depth, rng, width, height),
        _ => random_builder(new_depth, rng, width, height)
    }
}
}
还在顶部添加这个:
#![allow(unused)]
fn main() {
mod limestone_cavern;
use limestone_cavern::limestone_cavern_builder;
}
我们添加了 limestone_cavern_builder - 让我们继续创建它!创建一个新文件 map_builders/limestone_cavern.rs 并添加以下内容:
#![allow(unused)]
fn main() {
use super::{BuilderChain, DrunkardsWalkBuilder, XStart, YStart, AreaStartingPosition,
    CullUnreachable, VoronoiSpawning, MetaMapBuilder, BuilderMap, TileType, DistantExit};
use rltk::RandomNumberGenerator;
use crate::map;

pub fn limestone_cavern_builder(new_depth: i32, _rng: &mut rltk::RandomNumberGenerator, width: i32, height: i32) -> BuilderChain {
    let mut chain = BuilderChain::new(new_depth, width, height, "Limestone Caverns");
    chain.start_with(DrunkardsWalkBuilder::winding_passages());
    chain.with(AreaStartingPosition::new(XStart::CENTER, YStart::CENTER));
    chain.with(CullUnreachable::new());
    chain.with(AreaStartingPosition::new(XStart::LEFT, YStart::CENTER));
    chain.with(VoronoiSpawning::new());
    chain.with(DistantExit::new());
    chain
}
}
这非常简单:我们使用醉汉漫步算法以“蜿蜒通道”模式构建地图。然后我们将起点设置为中心,并剔除不可达区域。接下来,我们将入口放置在左侧中心,使用 Voronoi 算法生成,并将出口放置在远处。
这为您提供了一个可玩地图!怪物选择不是很好,但它可以工作。 这是我们一直在使用的灵活地图构建系统的一个很好的例子。
洞穴主题化
洞穴布局是一个良好的开端,但它看起来还不像石灰岩洞穴。 打开 map/themes.rs,我们将纠正这一点!我们将首先修改 get_tile_glyph 以了解此关卡:
#![allow(unused)]
fn main() {
pub fn tile_glyph(idx: usize, map : &Map) -> (rltk::FontCharType, RGB, RGB) {
let (glyph, mut fg, mut bg) = match map.depth {
    3 => get_limestone_cavern_glyph(idx, map),
    2 => get_forest_glyph(idx, map),
    _ => get_tile_glyph_default(idx, map)
};
}
现在我们需要编写 get_limestone_cavern_glyph。 我们希望它看起来像石灰岩洞穴。 这是我想出的(也许更有艺术天赋的人可以帮忙!):
#![allow(unused)]
fn main() {
fn get_limestone_cavern_glyph(idx:usize, map: &Map) -> (rltk::FontCharType, RGB, RGB) {
    let glyph;
    let fg;
    let bg = RGB::from_f32(0., 0., 0.);

    match map.tiles[idx] {
        TileType::Wall => { glyph = rltk::to_cp437('▒'); fg = RGB::from_f32(0.7, 0.7, 0.7); }
        TileType::Bridge => { glyph = rltk::to_cp437('.'); fg = RGB::named(rltk::CHOCOLATE); }
        TileType::Road => { glyph = rltk::to_cp437('≡'); fg = RGB::named(rltk::YELLOW); }
        TileType::Grass => { glyph = rltk::to_cp437('"'); fg = RGB::named(rltk::GREEN); }
        TileType::ShallowWater => { glyph = rltk::to_cp437('░'); fg = RGB::named(rltk::CYAN); }
        TileType::DeepWater => { glyph = rltk::to_cp437('▓'); fg = RGB::named(rltk::BLUE); }
        TileType::Gravel => { glyph = rltk::to_cp437(';'); fg = RGB::from_f32(0.5, 0.5, 0.5); }
        TileType::DownStairs => { glyph = rltk::to_cp437('>'); fg = RGB::from_f32(0., 1.0, 1.0); }
        TileType::UpStairs => { glyph = rltk::to_cp437('<'); fg = RGB::from_f32(0., 1.0, 1.0); }
        _ => { glyph = rltk::to_cp437('░'); fg = RGB::from_f32(0.4, 0.4, 0.4); }
    }

    (glyph, fg, bg)
}
}
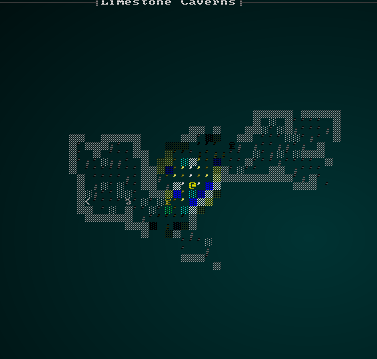
开局不错!环境看起来很像洞穴(而不是凿成的石头),颜色是令人愉悦的中性浅灰色,但又不会刺眼。 它使其他实体非常突出:

仅仅添加水和砾石
我们可以通过添加一些水(像这样的洞穴网络没有水是不寻常的),并将一些地板瓷砖变成砾石来进一步改善地图 - 以显示地图上的巨石。我们还可以添加一些钟乳石和石笋(由滴水缓慢沉积钙质经过数个世纪形成的巨大石柱)以增加风味。 因此,我们将首先在构建器中添加一个新层(作为最后一步):
#![allow(unused)]
fn main() {
chain.with(CaveDecorator::new());
}
然后我们需要编写它:
#![allow(unused)]
fn main() {
pub struct CaveDecorator {}

impl MetaMapBuilder for CaveDecorator {
    fn build_map(&mut self, rng: &mut rltk::RandomNumberGenerator, build_data : &mut BuilderMap)  {
        self.build(rng, build_data);
    }
}

impl CaveDecorator {
    #[allow(dead_code)]
    pub fn new() -> Box<CaveDecorator> {
        Box::new(CaveDecorator{})
    }

    fn build(&mut self, rng : &mut RandomNumberGenerator, build_data : &mut BuilderMap) {
        let old_map = build_data.map.clone();
        for (idx,tt) in build_data.map.tiles.iter_mut().enumerate() {
            // 砾石生成
            if *tt == TileType::Floor && rng.roll_dice(1, 6)==1 {
                *tt = TileType::Gravel;
            } else if *tt == TileType::Floor && rng.roll_dice(1, 10)==1 {
                // 生成可通行的水池
                *tt = TileType::ShallowWater;
            } else if *tt == TileType::Wall {
                // 生成深水池和钟乳石
                let mut neighbors = 0;
                let x = idx as i32 % old_map.width;
                let y = idx as i32 / old_map.width;
                if x > 0 && old_map.tiles[idx-1] == TileType::Wall { neighbors += 1; }
                if x < old_map.width - 2 && old_map.tiles[idx+1] == TileType::Wall { neighbors += 1; }
                if y > 0 && old_map.tiles[idx-old_map.width as usize] == TileType::Wall { neighbors += 1; }
                if y < old_map.height - 2 && old_map.tiles[idx+old_map.width as usize] == TileType::Wall { neighbors += 1; }
                if neighbors == 2 {
                    *tt = TileType::DeepWater;
                } else if neighbors == 1 {
                    let roll = rng.roll_dice(1, 4);
                    match roll {
                        1 => *tt = TileType::Stalactite,
                        2 => *tt = TileType::Stalagmite,
                        _ => {}
                    }
                }
            }
        }
        build_data.take_snapshot();
    }
}
}
其工作原理如下:
- 我们遍历地图的所有瓷砖类型和地图索引。 这是一个可变迭代器 - 我们希望能够更改瓷砖。
- 如果瓷砖是
Floor,我们有 1/6 的几率将其变成砾石。 - 如果我们没有这样做,我们有 1/10 的几率将其变成浅水池(仍然可以通行)。
- 如果它是墙壁,我们会计算有多少其他墙壁环绕着它。
- 如果有 2 个邻居,我们将瓷砖替换为
DeepWater- 漂亮的深色水,玩家无法通行。 - 如果有 1 个邻居,我们掷一个 4 面骰子。 如果掷出 1,我们将其变成钟乳石; 如果掷出 2,我们将其变成石笋。 否则,我们什么都不做。
这确实需要我们打开 map/tiletype.rs 并引入新的瓷砖类型:
#![allow(unused)]
fn main() {
#[derive(PartialEq, Eq, Hash, Copy, Clone, Serialize, Deserialize)]
pub enum TileType {
    Wall,
    Stalactite,
    Stalagmite,
    Floor,
    DownStairs,
    Road,
    Grass,
    ShallowWater,
    DeepWater,
    WoodFloor,
    Bridge,
    Gravel,
    UpStairs
}
}
我们使新的瓷砖类型阻挡视野:
#![allow(unused)]
fn main() {
pub fn tile_opaque(tt : TileType) -> bool {
    match tt {
        TileType::Wall | TileType::Stalactite | TileType::Stalagmite => true,
        _ => false
    }
}
}
我们还将它们添加到 map/themes.rs 中的新石灰岩主题和默认主题中:
#![allow(unused)]
fn main() {
TileType::Stalactite => { glyph = rltk::to_cp437('╨'); fg = RGB::from_f32(0.5, 0.5, 0.5); }
TileType::Stalagmite => { glyph = rltk::to_cp437('╥'); fg = RGB::from_f32(0.5, 0.5, 0.5); }
}
这给出了一个非常令人愉悦的,相当自然(和潮湿)的洞穴:

填充洞穴
洞穴本身就非常可玩,但它们与我们描述的 NPC 在类型方面不太匹配。洞穴里有一些森林怪物和鹿,这不太合理! 让我们首先打开 spawns.rs 并更改一些生物出现的深度以避免这种情况:
"spawn_table" : [
    { "name" : "Goblin", "weight" : 10, "min_depth" : 3, "max_depth" : 100 },
    { "name" : "Orc", "weight" : 1, "min_depth" : 3, "max_depth" : 100, "add_map_depth_to_weight" : true },
    { "name" : "Health Potion", "weight" : 7, "min_depth" : 0, "max_depth" : 100 },
    { "name" : "Fireball Scroll", "weight" : 2, "min_depth" : 0, "max_depth" : 100, "add_map_depth_to_weight" : true },
    { "name" : "Confusion Scroll", "weight" : 2, "min_depth" : 0, "max_depth" : 100, "add_map_depth_to_weight" : true },
    { "name" : "Magic Missile Scroll", "weight" : 4, "min_depth" : 0, "max_depth" : 100 },
    { "name" : "Dagger", "weight" : 3, "min_depth" : 0, "max_depth" : 100 },
    { "name" : "Shield", "weight" : 3, "min_depth" : 0, "max_depth" : 100 },
    { "name" : "Longsword", "weight" : 1, "min_depth" : 3, "max_depth" : 100 },
    { "name" : "Tower Shield", "weight" : 1, "min_depth" : 3, "max_depth" : 100 },
    { "name" : "Rations", "weight" : 10, "min_depth" : 0, "max_depth" : 100 },
    { "name" : "Magic Mapping Scroll", "weight" : 2, "min_depth" : 0, "max_depth" : 100 },
    { "name" : "Bear Trap", "weight" : 5, "min_depth" : 0, "max_depth" : 100 },
    { "name" : "Battleaxe", "weight" : 1, "min_depth" : 2, "max_depth" : 100 },
    { "name" : "Kobold", "weight" : 15, "min_depth" : 3, "max_depth" : 5 },
    { "name" : "Rat", "weight" : 15, "min_depth" : 2, "max_depth" : 2 },
    { "name" : "Mangy Wolf", "weight" : 13, "min_depth" : 2, "max_depth" : 2 },
    { "name" : "Deer", "weight" : 14, "min_depth" : 2, "max_depth" : 2 },
    { "name" : "Bandit", "weight" : 9, "min_depth" : 2, "max_depth" : 3 }
],
我们将土匪留在了洞穴中,因为他们可能会在那里寻求庇护 - 但不再有狼、鹿或异常大的啮齿动物(反正我们现在可能已经厌倦了它们!)。在洞穴里还会发现什么? d20 系统遭遇表 提出了一些建议:
恐狼,火甲虫,人类骷髅,巨型蜈蚣,蜘蛛群,人类僵尸,扼杀怪,骷髅勇士,地精,食尸鬼,巨型蜘蛛,鸡蛇兽,凝胶状立方怪,锈蚀怪,阴影,幽灵,翼龙,暗潜怪,穴居人,熊地精,瓦格伊,
灰色软泥怪,拟像怪和食人魔(我的天哪)
真是个长长的清单! 考虑到地下城的 这一层,其中一些是有道理的:蜘蛛肯定会喜欢阴暗的地方。“翼龙”基本上是邪恶的蝙蝠,所以我们应该添加蝙蝠。我们有地精和狗头人以及偶尔的兽人。我们已经决定暂时厌倦老鼠了! 我是凝胶状立方怪的忠实粉丝,所以我也很想把它们放进去! 由于难度原因,许多其他怪物最好留到以后的关卡。
所以让我们将它们添加到生成表中:
{ "name" : "Bat", "weight" : 15, "min_depth" : 3, "max_depth" : 3 },
{ "name" : "Large Spider", "weight" : 3, "min_depth" : 3, "max_depth" : 3 },
{ "name" : "Gelatinous Cube", "weight" : 3, "min_depth" : 3, "max_depth" : 3 }
我们将蝙蝠设为非常常见,大型蜘蛛和凝胶状立方怪非常稀有。 让我们继续将它们添加到 spawns.json 的 mobs 部分:
{
    "name" : "Bat",
    "renderable": {
        "glyph" : "b",
        "fg" : "#995555",
        "bg" : "#000000",
        "order" : 1
    },
    "blocks_tile" : true,
    "vision_range" : 6,
    "ai" : "herbivore",
    "attributes" : {
        "Might" : 3,
        "Fitness" : 3
    },
    "skills" : {
        "Melee" : -1,
        "Defense" : -1
    },
    "natural" : {
        "armor_class" : 11,
        "attacks" : [
            { "name" : "bite", "hit_bonus" : 0, "damage" : "1d4" }
        ]
    }
},

{
    "name" : "Large Spider",
    "level" : 2,
    "attributes" : {},
    "renderable": {
        "glyph" : "s",
        "fg" : "#FF0000",
        "bg" : "#000000",
        "order" : 1
    },
    "blocks_tile" : true,
    "vision_range" : 6,
    "ai" : "carnivore",
    "natural" : {
        "armor_class" : 12,
        "attacks" : [
            { "name" : "bite", "hit_bonus" : 1, "damage" : "1d12" }
        ]
    }
},

{
    "name" : "Gelatinous Cube",
    "level" : 2,
    "attributes" : {},
    "renderable": {
        "glyph" : "▄",
        "fg" : "#FF0000",
        "bg" : "#000000",
        "order" : 1
    },
    "blocks_tile" : true,
    "vision_range" : 4,
    "ai" : "carnivore",
    "natural" : {
        "armor_class" : 12,
        "attacks" : [
            { "name" : "engulf", "hit_bonus" : 0, "damage" : "1d8" }
        ]
    }
}
所以蝙蝠是无害的食草动物,它们大部分时间都在逃离你。 蜘蛛和立方体会猎杀其他人并吃掉它们。 我们还将它们设为 2 级 - 因此它们值得更多经验,并且更难杀死。 玩家很可能已经准备好迎接这个挑战。 所以我们可以 cargo run 并试一试!
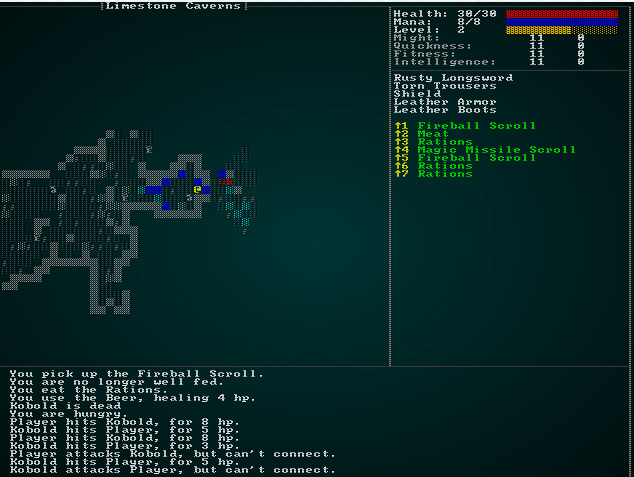
还不错! 它可玩,正确的怪物出现,总体而言体验还不错。
光照!
使石灰岩洞穴如此令人惊叹的事情之一是光照; 您可以使用头盔火炬的光线穿过大理石向外窥视,投下阴影并赋予一切怪异的外观。 我们可以轻松地为游戏添加装饰性照明(它可能会在某个时候进入潜行系统!)
让我们首先创建一个新的组件 LightSource。 在 components.rs 中:
#![allow(unused)]
fn main() {
#[derive(Component, Serialize, Deserialize, Clone)]
pub struct LightSource {
    pub color : RGB,
    pub range: i32
}
}
与往常一样,在 main.rs 和 saveload_system.rs 中注册您的新组件! 光源定义了两个值:color(光的颜色)和 range - 这将控制其强度/衰减。 我们还需要将光照信息添加到地图中。 在 map/mod.rs 中:
#![allow(unused)]
fn main() {
#[derive(Default, Serialize, Deserialize, Clone)]
pub struct Map {
    pub tiles : Vec<TileType>,
    pub width : i32,
    pub height : i32,
    pub revealed_tiles : Vec<bool>,
    pub visible_tiles : Vec<bool>,
    pub blocked : Vec<bool>,
    pub depth : i32,
    pub bloodstains : HashSet<usize>,
    pub view_blocked : HashSet<usize>,
    pub name : String,
    pub outdoors : bool,
    pub light : Vec<rltk::RGB>,

    #[serde(skip_serializing)]
    #[serde(skip_deserializing)]
    pub tile_content : Vec<Vec<Entity>>
}
}
这里有两个新值:outdoors,表示“有自然光,不要应用照明”,以及 light - 这是一个 RGB 颜色向量,指示每个瓷砖上的光照水平。 您还需要更新 new 构造函数以包含这些内容:
#![allow(unused)]
fn main() {
pub fn new<S : ToString>(new_depth : i32, width: i32, height: i32, name: S) -> Map {
    let map_tile_count = (width*height) as usize;
    Map{
        tiles : vec![TileType::Wall; map_tile_count],
        width,
        height,
        revealed_tiles : vec![false; map_tile_count],
        visible_tiles : vec![false; map_tile_count],
        blocked : vec![false; map_tile_count],
        tile_content : vec![Vec::new(); map_tile_count],
        depth: new_depth,
        bloodstains: HashSet::new(),
        view_blocked : HashSet::new(),
        name : name.to_string(),
        outdoors : true,
        light: vec![rltk::RGB::from_f32(0.0, 0.0, 0.0); map_tile_count]
    }
}
}
请注意,我们将 outdoors 设置为默认模式 - 因此照明不会突然应用于所有地图(可能会搞砸我们已经完成的工作;很难解释为什么你早上醒来天空是黑色的 - 嗯,这可能是另一个游戏的故事钩子!)。 我们还将照明初始化为全黑,每个瓷砖一种颜色。
现在,我们将调整 map/themes.rs 以处理照明。 我们故意不使实体变暗(这样您仍然可以发现它们),只是地图瓷砖:
#![allow(unused)]
fn main() {
pub fn tile_glyph(idx: usize, map : &Map) -> (rltk::FontCharType, RGB, RGB) {
    let (glyph, mut fg, mut bg) = match map.depth {
        3 => get_limestone_cavern_glyph(idx, map),
        2 => get_forest_glyph(idx, map),
        _ => get_tile_glyph_default(idx, map)
    };

    if map.bloodstains.contains(&idx) { bg = RGB::from_f32(0.75, 0., 0.); }
    if !map.visible_tiles[idx] {
        fg = fg.to_greyscale();
        bg = RGB::from_f32(0., 0., 0.); // 不显示视野范围外的血迹
    } else if !map.outdoors {
        fg = fg * map.light[idx];
        bg = bg * map.light[idx];
    }

    (glyph, fg, bg)
}
}
这非常简单:如果我们看不到瓷砖,我们仍然会使用灰度。 如果我们可以看到瓷砖,并且 outdoors 是 false - 那么我们将颜色乘以光强度。
接下来,让我们给玩家一个光源。 现在,我们将始终给他/她/它一个略带黄色的火炬。 在 spawner.rs 中,将此添加到为玩家构建的组件列表中:
#![allow(unused)]
fn main() {
.with(LightSource{ color: rltk::RGB::from_f32(1.0, 1.0, 0.5), range: 8 })
}
我们还将更新我们的 map_builders/limestone_caverns.rs 以在洞穴中使用照明。 在自定义构建器的末尾,将 take_snapshot 更改为:
#![allow(unused)]
fn main() {
build_data.take_snapshot();
build_data.map.outdoors = false;
}
最后,我们需要一个 系统 来实际计算照明。 创建一个新文件 lighting_system.rs:
#![allow(unused)]
fn main() {
use specs::prelude::*;
use super::{Viewshed, Position, Map, LightSource};
use rltk::RGB;

pub struct LightingSystem {}

impl<'a> System<'a> for LightingSystem {
    #[allow(clippy::type_complexity)]
    type SystemData = ( WriteExpect<'a, Map>,
                        ReadStorage<'a, Viewshed>,
                        ReadStorage<'a, Position>,
                        ReadStorage<'a, LightSource>);

    fn run(&mut self, data : Self::SystemData) {
        let (mut map, viewshed, positions, lighting) = data;

        if map.outdoors {
            return;
        }

        let black = RGB::from_f32(0.0, 0.0, 0.0);
        for l in map.light.iter_mut() {
            *l = black;
        }

        for (viewshed, pos, light) in (&viewshed, &positions, &lighting).join() {
            let light_point = rltk::Point::new(pos.x, pos.y);
            let range_f = light.range as f32;
            for t in viewshed.visible_tiles.iter() {
                if t.x > 0 && t.x < map.width && t.y > 0 && t.y < map.height {
                    let idx = map.xy_idx(t.x, t.y);
                    let distance = rltk::DistanceAlg::Pythagoras.distance2d(light_point, *t);
                    let intensity = (range_f - distance) / range_f;

                    map.light[idx] = map.light[idx] + (light.color * intensity);
                }
            }
        }
    }
}
}
这是一个非常简单的系统! 如果地图在户外,它只是简单地返回。 否则:
- 它将整个地图照明设置为黑暗。
- 它迭代所有具有位置、视野和光源的实体。
- 对于这些实体中的每一个,它都会迭代所有可见的瓷砖。
- 它计算可见瓷砖到光源的距离,并将其反转 - 因此距离光源越远就越暗。 然后将其除以光的范围,以将其缩放到 0..1 范围。
- 此照明量被添加到瓷砖的照明中。
最后,我们将系统添加到 main.rs 的 run_systems 函数中(作为要运行的最后一个系统):
#![allow(unused)]
fn main() {
let mut lighting = lighting_system::LightingSystem{};
lighting.run_now(&self.ecs);
}
如果您现在 cargo run,您将拥有一个功能齐全的照明系统!
剩下的就是让 NPC 也拥有光照。 在 raws/mob_structs.rs 中,添加一个新类:
#![allow(unused)]
fn main() {
#[derive(Deserialize, Debug)]
pub struct MobLight {
    pub range : i32,
    pub color : String
}
}
并将其添加到主要的 mob 结构中:
#![allow(unused)]
fn main() {
#[derive(Deserialize, Debug)]
pub struct Mob {
    pub name : String,
    pub renderable : Option<Renderable>,
    pub blocks_tile : bool,
    pub vision_range : i32,
    pub ai : String,
    pub quips : Option<Vec<String>>,
    pub attributes : MobAttributes,
    pub skills : Option<HashMap<String, i32>>,
    pub level : Option<i32>,
    pub hp : Option<i32>,
    pub mana : Option<i32>,
    pub equipped : Option<Vec<String>>,
    pub natural : Option<MobNatural>,
    pub loot_table : Option<String>,
    pub light : Option<MobLight>
}
}
现在我们可以修改 raws/rawmaster.rs 中的 spawn_named_mob 以支持它:
#![allow(unused)]
fn main() {
if let Some(light) = &mob_template.light {
    eb = eb.with(LightSource{ range: light.range, color : rltk::RGB::from_hex(&light.color).expect("Bad color") });
}
}
让我们修改凝胶状立方怪使其发光。 在 spawns.json 中:
{
    "name" : "Gelatinous Cube",
    "level" : 2,
    "attributes" : {},
    "renderable": {
        "glyph" : "▄",
        "fg" : "#FF0000",
        "bg" : "#000000",
        "order" : 1
    },
    "blocks_tile" : true,
    "vision_range" : 4,
    "ai" : "carnivore",
    "natural" : {
        "armor_class" : 12,
        "attacks" : [
            { "name" : "engulf", "hit_bonus" : 0, "damage" : "1d8" }
        ]
    },
    "light" : {
        "range" : 4,
        "color" : "#550000"
    }
}
我们还将给土匪一个火炬:
{
    "name" : "Bandit",
    "renderable": {
        "glyph" : "☻",
        "fg" : "#FF0000",
        "bg" : "#000000",
        "order" : 1
    },
    "blocks_tile" : true,
    "vision_range" : 6,
    "ai" : "melee",
    "quips" : [ "Stand and deliver!", "Alright, hand it over" ],
    "attributes" : {},
    "equipped" : [ "Dagger", "Shield", "Leather Armor", "Leather Boots" ],
    "light" : {
        "range" : 6,
        "color" : "#FFFF55"
    }
},
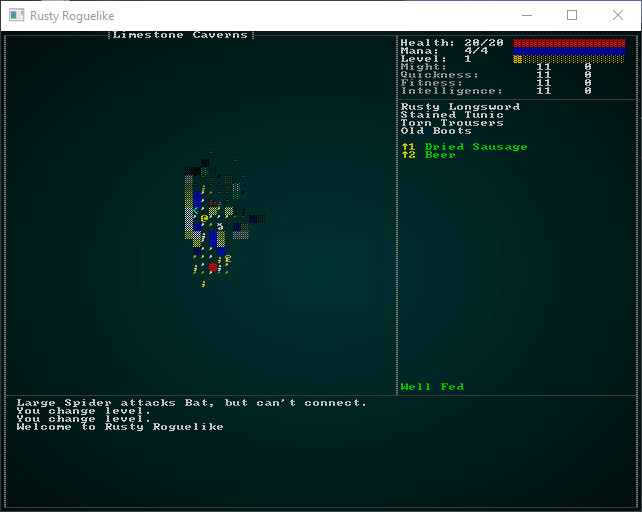
现在,当您 cargo run 并在洞穴中漫游时 - 您将看到从这些实体发出的光。 这是一个拿着火炬的土匪:
总结
在本章中,我们添加了一个全新的关卡和主题 - 并点亮了洞穴! 进展还不错。 游戏真的开始整合在一起了。
...
本章的源代码可以在这里找到
在您的浏览器中使用 web assembly 运行本章的示例(需要 WebGL2)
版权所有 (C) 2019, Herbert Wolverson。