魔法咒语 - 终于找到了蓝色法力条的用途
关于本教程
本教程是免费且开源的,所有代码均使用 MIT 许可证 - 因此您可以随意使用。我希望您会喜欢本教程,并制作出伟大的游戏!
如果您喜欢这个教程并希望我继续写作,请考虑支持 我的 Patreon。
前几章一直在为实现这一章铺路:施法。屏幕上出现蓝色法力条已经有一段时间了,现在我们让它做一些有用的事情!
了解咒语
施法是游戏的一种可选玩法 - 如果你喜欢硬碰硬,也能玩得很好。角色扮演游戏中一个常见的特性是,你必须先学会咒语才能施放;你努力学习,记住手势和咒语,现在就可以向世界释放你强大的魔法力量了。
这首先意味着实体需要能够了解咒语。一个好的副作用是,它为我们提供了一种方便的方式来为怪物添加特殊攻击 - 我们稍后会介绍。现在,我们将在 components.rs 中添加一个新的组件(并在 main.rs 和 saveload_system.rs 中注册):
#![allow(unused)]
fn main() {
#[derive(Debug, Serialize, Deserialize, Clone)]
pub struct KnownSpell {
    pub display_name : String,
    pub mana_cost : i32
}

#[derive(Component, Debug, Serialize, Deserialize, Clone)]
pub struct KnownSpells {
    pub spells : Vec<KnownSpell>
}
}
我们还将它添加到 spawner.rs 的 player 函数中。最终,我们将清空咒语列表(只需将其设置为 Vec::new(),但现在我们将添加 Zap 作为占位符):
#![allow(unused)]
fn main() {
.with(KnownSpells{ spells : vec![ KnownSpell{ display_name : "Zap".to_string(), mana_cost: 1 } ] })
}
如果你还记得 4.9 节,我们指定用户界面应该列出你可以施放的咒语。我们预期的界面看起来像这样:
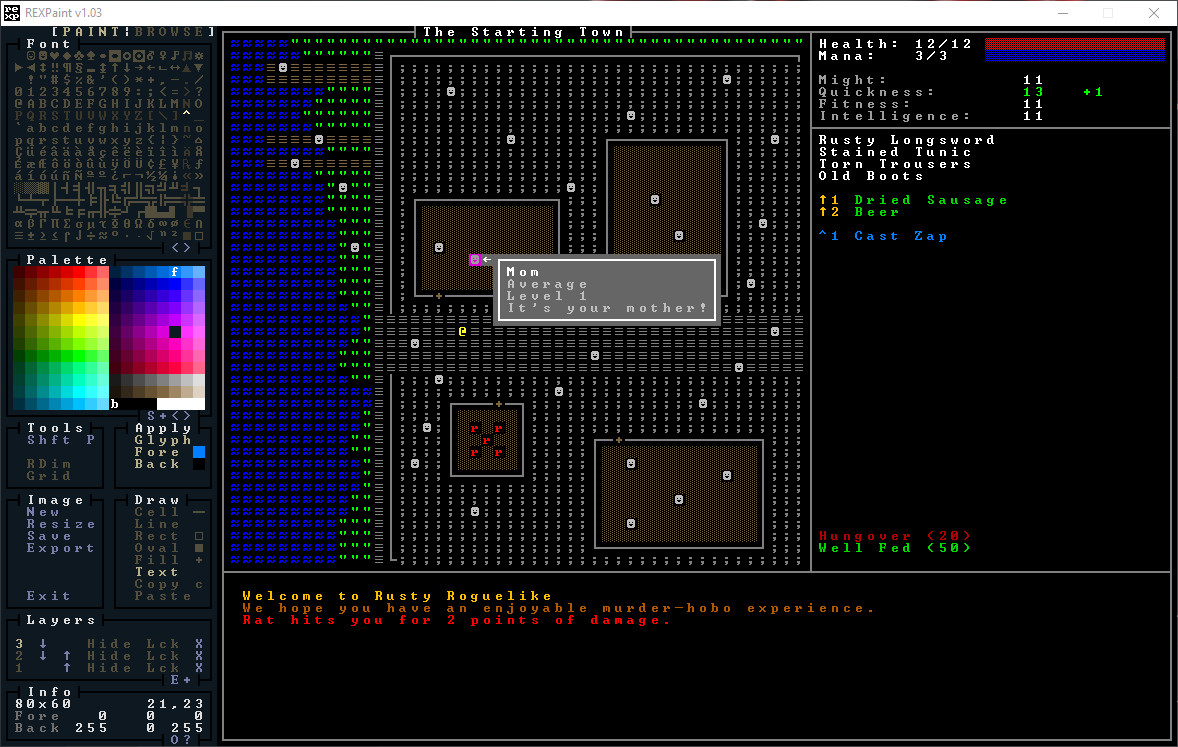
现在我们有了填充这些内容所需的数据!打开 gui.rs,找到 draw_ui 中渲染消耗品的部分。在其正下方,插入以下代码:
#![allow(unused)]
fn main() {
// 咒语
y += 1;
let blue = RGB::named(rltk::CYAN);
let known_spells_storage = ecs.read_storage::<KnownSpells>();
let known_spells = &known_spells_storage.get(*player_entity).unwrap().spells;
let mut index = 1;
for spell in known_spells.iter() {
    ctx.print_color(50, y, blue, black, &format!("^{}", index));
    ctx.print_color(53, y, blue, black, &format!("{} ({})", spell.display_name, spell.mana_cost));
    index += 1;
    y += 1;
}
}
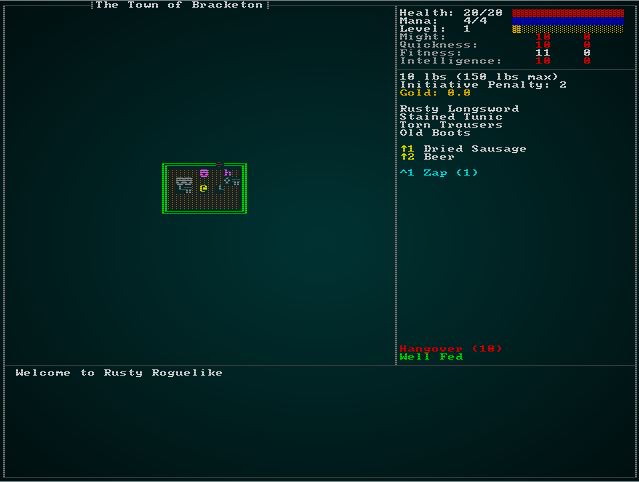
这段代码读取 KnownSpells 组件(玩家必须拥有一个),提取列表并使用它来渲染带有快捷键列表的咒语。我们将蓝色改为了青色以提高可读性,但看起来还不错:
施放咒语
显示咒语是一个好的开始,但我们需要能够真正施放(或尝试施放)它们!你可能还记得在 player.rs 中我们处理了消耗品快捷键。我们将使用非常相似的系统来处理咒语快捷键。在 player_input 中,添加以下内容:
#![allow(unused)]
fn main() {
if ctx.control && ctx.key.is_some() {
    let key : Option<i32> =
        match ctx.key.unwrap() {
            VirtualKeyCode::Key1 => Some(1),
            VirtualKeyCode::Key2 => Some(2),
            VirtualKeyCode::Key3 => Some(3),
            VirtualKeyCode::Key4 => Some(4),
            VirtualKeyCode::Key5 => Some(5),
            VirtualKeyCode::Key6 => Some(6),
            VirtualKeyCode::Key7 => Some(7),
            VirtualKeyCode::Key8 => Some(8),
            VirtualKeyCode::Key9 => Some(9),
            _ => None
        };
    if let Some(key) = key {
        return use_spell_hotkey(gs, key-1);
    }
}
}
这就像消耗品快捷键代码一样(明智的用户会将其中一些重构为一个函数,但为了教程的清晰起见,我们将它们分开)。它调用了 use_spell_hotkey - 我们还没有编写这个函数!让我们开始编写:
#![allow(unused)]
fn main() {
fn use_spell_hotkey(gs: &mut State, key: i32) -> RunState {
    use super::KnownSpells;

    let player_entity = gs.ecs.fetch::<Entity>();
    let known_spells_storage = gs.ecs.read_storage::<KnownSpells>();
    let known_spells = &known_spells_storage.get(*player_entity).unwrap().spells;

    if (key as usize) < known_spells.len() {
        let pools = gs.ecs.read_storage::<Pools>();
        let player_pools = pools.get(*player_entity).unwrap();
        if player_pools.mana.current >= known_spells[key as usize].mana_cost {
            // TODO: 施放咒语
        } else {
            let mut gamelog = gs.ecs.fetch_mut::<GameLog>();
            gamelog.entries.push("你没有足够的法力来施放那个咒语!".to_string());
        }
    }

    RunState::Ticking
}
}
注意其中大的 TODO!在我们可以真正实现施法之前,我们需要先建立一些基础设施。
定义我们的 Zap 咒语
我们在这里遇到一点障碍的主要原因是,我们实际上还没有告诉引擎 Zap 咒语是做什么的。我们在原始的 spawns.json 文件中定义了其他所有内容,所以让我们添加一个新的 spells 部分:
"spells" : [
    {
        "name" : "Zap",
        "effects" : {
            "ranged" : "6",
            "damage" : "5",
            "particle_line" : "▓;#00FFFF;200.0"
        }
    }
]
让我们扩展我们的 raws 系统,使其能够读取这个,并在游戏中可用。我们将从一个新文件 raws/spell_structs.rs 开始,它将定义咒语对 JSON 系统来说是什么样的:
#![allow(unused)]
fn main() {
use serde::{Deserialize};
use std::collections::HashMap;

#[derive(Deserialize, Debug)]
pub struct Spell {
    pub name : String,
    pub effects : HashMap<String, String>
}
}
现在我们将在 raws/mod.rs 中添加 mod spells; pub use spells::Spell;,并扩展 Raws 结构以包含它:
#![allow(unused)]
fn main() {
mod spell_structs;
pub use spell_structs::Spell;
...
#[derive(Deserialize, Debug)]
pub struct Raws {
    pub items : Vec<Item>,
    pub mobs : Vec<Mob>,
    pub props : Vec<Prop>,
    pub spawn_table : Vec<SpawnTableEntry>,
    pub loot_tables : Vec<LootTable>,
    pub faction_table : Vec<FactionInfo>,
    pub spells : Vec<Spell>
}
}
既然我们已经创建了字段,我们应该将其添加到 raws/rawmaster.rs 中的 empty() 系统中。我们还将添加一个索引,就像其他原始类型一样:
#![allow(unused)]
fn main() {
pub struct RawMaster {
    raws : Raws,
    item_index : HashMap<String, usize>,
    mob_index : HashMap<String, usize>,
    prop_index : HashMap<String, usize>,
    loot_index : HashMap<String, usize>,
    faction_index : HashMap<String, HashMap<Reaction>>,
    spell_index : HashMap<String, usize>
}

impl RawMaster {
    pub fn empty() -> RawMaster {
        RawMaster {
            raws : Raws{
                items: Vec::new(),
                mobs: Vec::new(),
                props: Vec::new(),
                spawn_table: Vec::new(),
                loot_tables: Vec::new(),
                faction_table : Vec::new(),
                spells : Vec::new()
            },
            item_index : HashMap::new(),
            mob_index : HashMap::new(),
            prop_index : HashMap::new(),
            loot_index : HashMap::new(),
            faction_index : HashMap::new(),
            spell_index : HashMap::new()
        }
    }
}
在 load 函数中,我们需要填充索引:
#![allow(unused)]
fn main() {
for (i,spell) in self.raws.spells.iter().enumerate() {
    self.spell_index.insert(spell.name.clone(), i);
}
}
我们将咒语设计与现有的物品效果系统紧密结合,但现在我们遇到了另一个小问题:我们实际上并没有将咒语作为实体生成 - 在某些情况下,它们只是直接进入效果系统。但是,如果能够继续使用我们编写的所有效果代码,那就太好了。所以我们将为咒语生成模板实体。这允许我们找到咒语模板,并使用现有代码来生成其结果。首先,在 components.rs 中(并在 main.rs 和 saveload_system.rs 中注册),我们将创建一个新的 SpellTemplate 组件:
#![allow(unused)]
fn main() {
#[derive(Component, Debug, Serialize, Deserialize, Clone)]
pub struct SpellTemplate {
    pub mana_cost : i32
}
}
在 raws/rawmaster.rs 中,我们需要一个新函数:spawn_named_spell:
#![allow(unused)]
fn main() {
pub fn spawn_named_spell(raws: &RawMaster, ecs : &mut World, key : &str) -> Option<Entity> {
    if raws.spell_index.contains_key(key) {
        let spell_template = &raws.raws.spells[raws.spell_index[key]];

        let mut eb = ecs.create_entity().marked::<SimpleMarker<SerializeMe>>();
        eb = eb.with(SpellTemplate{ mana_cost : spell_template.mana_cost });
        eb = eb.with(Name{ name : spell_template.name.clone() });
        apply_effects!(spell_template.effects, eb);

        return Some(eb.build());
    }
    None
}
}
这很简单:我们创建一个新实体,将其标记为可序列化和作为咒语模板,给它一个名称,并使用我们现有的 effects! 宏来填充空白。然后我们返回该实体。
我们希望在新游戏开始时对所有咒语执行此操作。我们将首先在 raws/rawmaster.rs 中添加一个函数,为所有咒语调用它:
#![allow(unused)]
fn main() {
pub fn spawn_all_spells(ecs : &mut World) {
    let raws = &super::RAWS.lock().unwrap();
    for spell in raws.raws.spells.iter() {
        spawn_named_spell(raws, ecs, &spell.name);
    }
}
}
由于玩家只生成一次,我们将在 spawner.rs 的 player 函数的开头调用它。这保证了它会存在,因为没有玩家是一个致命的错误(也是一件令人悲伤的事情!):
#![allow(unused)]
fn main() {
pub fn player(ecs : &mut World, player_x : i32, player_y : i32) -> Entity {
    spawn_all_spells(ecs);
    ...
}
最后,我们将添加一个实用函数(到 raws/rawmaster.rs),以帮助我们找到咒语实体。这非常简单:
#![allow(unused)]
fn main() {
pub fn find_spell_entity(ecs : &World, name : &str) -> Option<Entity> {
    let names = ecs.read_storage::<Name>();
    let spell_templates = ecs.read_storage::<SpellTemplate>();
    let entities = ecs.entities();

    for (entity, sname, _template) in (&entities, &names, &spell_templates).join() {
        if name == sname.name {
            return Some(entity);
        }
    }
    None
}
}
排队 Zap
现在我们已经将 Zap 定义为咒语模板,我们可以完成我们之前开始的 spell_hotkeys 系统。首先,我们需要一个组件来指示施放咒语的意愿。在 components.rs 中(并在 main.rs 和 saveload_system.rs 中注册):
#![allow(unused)]
fn main() {
#[derive(Component, Debug, ConvertSaveload, Clone)]
pub struct WantsToCastSpell {
    pub spell : Entity,
    pub target : Option<rltk::Point>
}
}
这为我们提供了足够的信息来完成 player.rs 中的施法:
#![allow(unused)]
fn main() {
fn use_spell_hotkey(gs: &mut State, key: i32) -> RunState {
    use super::KnownSpells;
    use super::raws::find_spell_entity;

    let player_entity = gs.ecs.fetch::<Entity>();
    let known_spells_storage = gs.ecs.read_storage::<KnownSpells>();
    let known_spells = &known_spells_storage.get(*player_entity).unwrap().spells;

    if (key as usize) < known_spells.len() {
        let pools = gs.ecs.read_storage::<Pools>();
        let player_pools = pools.get(*player_entity).unwrap();
        if player_pools.mana.current >= known_spells[key as usize].mana_cost {
            if let Some(spell_entity) = find_spell_entity(&gs.ecs, &known_spells[key as usize].display_name) {
                use crate::components::Ranged;
                if let Some(ranged) = gs.ecs.read_storage::<Ranged>().get(spell_entity) {
                    return RunState::ShowTargeting{ range: ranged.range, item: spell_entity };
                };
                let mut intent = gs.ecs.write_storage::<WantsToCastSpell>();
                intent.insert(
                    *player_entity,
                    WantsToCastSpell{ spell: spell_entity, target: None }
                ).expect("无法插入意图");
                return RunState::Ticking;
            }
        } else {
            let mut gamelog = gs.ecs.fetch_mut::<GameLog>();
            gamelog.entries.push("你没有足够的法力来施放那个咒语!".to_string());
        }
    }

    RunState::Ticking
}
}
你会注意到我们正在重用 ShowTargeting - 但是使用的是咒语实体而不是物品。我们需要调整 main.rs 中的条件来处理这种情况:
#![allow(unused)]
fn main() {
RunState::ShowTargeting{range, item} => {
    let result = gui::ranged_target(self, ctx, range);
    match result.0 {
        gui::ItemMenuResult::Cancel => newrunstate = RunState::AwaitingInput,
        gui::ItemMenuResult::NoResponse => {}
        gui::ItemMenuResult::Selected => {
            if self.ecs.read_storage::<SpellTemplate>().get(item).is_some() {
                let mut intent = self.ecs.write_storage::<WantsToCastSpell>();
                intent.insert(*self.ecs.fetch::<Entity>(), WantsToCastSpell{ spell: item, target: result.1 }).expect("无法插入意图");
                newrunstate = RunState::Ticking;
            } else {
                let mut intent = self.ecs.write_storage::<WantsToUseItem>();
                intent.insert(*self.ecs.fetch::<Entity>(), WantsToUseItem{ item, target: result.1 }).expect("无法插入意图");
                newrunstate = RunState::Ticking;
            }
        }
    }
}
}
因此,当选择目标时,它会查看 item 实体 - 如果它有咒语组件,它会启动 WantsToCastSpell - 否则它会坚持使用 WantsToUseItem。
你可能已经注意到我们实际上没有在任何地方使用 WantsToCastSpell!我们需要另一个系统来处理它。它基本上与使用物品相同,所以我们将在它旁边添加它。在 inventory_system/use_system.rs 中,我们将添加第二个系统:
#![allow(unused)]
fn main() {
use specs::prelude::*;
use super::{Name, WantsToUseItem,Map, AreaOfEffect, EquipmentChanged, IdentifiedItem, WantsToCastSpell};
use crate::effects::*;
...
// ItemUseSystem 在这里
...
pub struct SpellUseSystem {}

impl<'a> System<'a> for SpellUseSystem {
    #[allow(clippy::type_complexity)]
    type SystemData = ( ReadExpect<'a, Entity>,
                        WriteExpect<'a, Map>,
                        Entities<'a>,
                        WriteStorage<'a, WantsToCastSpell>,
                        ReadStorage<'a, Name>,
                        ReadStorage<'a, AreaOfEffect>,
                        WriteStorage<'a, EquipmentChanged>,
                        WriteStorage<'a, IdentifiedItem>
                      );

    #[allow(clippy::cognitive_complexity)]
    fn run(&mut self, data : Self::SystemData) {
        let (player_entity, map, entities, mut wants_use, names,
            aoe, mut dirty, mut identified_item) = data;

        for (entity, useitem) in (&entities, &wants_use).join() {
            dirty.insert(entity, EquipmentChanged{}).expect("无法插入");

            // 识别
            if entity == *player_entity {
                identified_item.insert(entity, IdentifiedItem{ name: names.get(useitem.spell).unwrap().name.clone() })
                    .expect("无法插入");
            }

            // 调用效果系统
            add_effect(
                Some(entity),
                EffectType::SpellUse{ spell : useitem.spell },
                match useitem.target {
                    None => Targets::Single{ target: *player_entity },
                    Some(target) => {
                        if let Some(aoe) = aoe.get(useitem.spell) {
                            Targets::Tiles{ tiles: aoe_tiles(&*map, target, aoe.radius) }
                        } else {
                            Targets::Tile{ tile_idx : map.xy_idx(target.x, target.y) as i32 }
                        }
                    }
                }
            );

        }

        wants_use.clear();
    }
}
}
这与 ItemUseSystem 非常相似,但以 WantsToCastSpell 作为输入。然后它将 EffectType::SpellUse 发送到效果系统。我们还没有编写它 - 让我们来编写它。我们将首先将其添加到 EffectType 枚举中:
#![allow(unused)]
fn main() {
#[derive(Debug)]
pub enum EffectType {
    Damage { amount : i32 },
    Bloodstain,
    Particle { glyph: rltk::FontCharType, fg : rltk::RGB, bg: rltk::RGB, lifespan: f32 },
    EntityDeath,
    ItemUse { item: Entity },
    SpellUse { spell: Entity },
    WellFed,
    Healing { amount : i32 },
    Confusion { turns : i32 },
    TriggerFire { trigger: Entity },
    TeleportTo { x:i32, y:i32, depth: i32, player_only : bool },
    AttributeEffect { bonus : AttributeBonus, name : String, duration : i32 }
}
}
然后我们需要将其添加到 spell_applicator 函数中:
#![allow(unused)]
fn main() {
fn target_applicator(ecs : &mut World, effect : &EffectSpawner) {
    if let EffectType::ItemUse{item} = effect.effect_type {
        triggers::item_trigger(effect.creator, item, &effect.targets, ecs);
    } else if let EffectType::SpellUse{spell} = effect.effect_type {
        triggers::spell_trigger(effect.creator, spell, &effect.targets, ecs);
    } else if let EffectType::TriggerFire{trigger} = effect.effect_type {
        triggers::trigger(effect.creator, trigger, &effect.targets, ecs);
    } else {
        match &effect.targets {
            Targets::Tile{tile_idx} => affect_tile(ecs, effect, *tile_idx),
            Targets::Tiles{tiles} => tiles.iter().for_each(|tile_idx| affect_tile(ecs, effect, *tile_idx)),
            Targets::Single{target} => affect_entity(ecs, effect, *target),
            Targets::TargetList{targets} => targets.iter().for_each(|entity| affect_entity(ecs, effect, *entity)),
        }
    }
}
}
这将施法发送到一个新的触发函数 spell_trigger。这在 triggers.rs 中定义:
#![allow(unused)]
fn main() {
pub fn spell_trigger(creator : Option<Entity>, spell: Entity, targets : &Targets, ecs: &mut World) {
    if let Some(template) = ecs.read_storage::<SpellTemplate>().get(spell) {
        let mut pools = ecs.write_storage::<Pools>();
        if let Some(caster) = creator {
            if let Some(pool) = pools.get_mut(caster) {
                if template.mana_cost <= pool.mana.current {
                    pool.mana.current -= template.mana_cost;
                }
            }
        }
    }
    event_trigger(creator, spell, targets, ecs);
}
}
这相对简单。它:
- 检查输入是否附加了咒语模板。
- 获取施法者的 Pools,以访问他们的法力。
- 将施法者的法力值减少咒语的消耗值。
- 将咒语发送到效果系统 - 我们已经编写了该系统。
我们还需要修复一个视觉问题。以前,find_item_position(在 effects/targeting.rs 中)一直足以弄清楚某些视觉效果的起始位置。由于物品现在是咒语模板 - 并且没有位置 - 视觉效果将无法正常工作。我们将向该函数添加一个额外的参数 - owner - 它可以回退到 owner 的位置:
#![allow(unused)]
fn main() {
pub fn find_item_position(ecs: &World, target: Entity, creator: Option<Entity>) -> Option<i32> {
    let positions = ecs.read_storage::<Position>();
    let map = ecs.fetch::<Map>();

    // 简单 - 它有一个位置
    if let Some(pos) = positions.get(target) {
        return Some(map.xy_idx(pos.x, pos.y) as i32);
    }

    // 也许它是被携带的?
    if let Some(carried) = ecs.read_storage::<InBackpack>().get(target) {
        if let Some(pos) = positions.get(carried.owner) {
            return Some(map.xy_idx(pos.x, pos.y) as i32);
        }
    }

    // 也许它是被装备的?
    if let Some(equipped) = ecs.read_storage::<Equipped>().get(target) {
        if let Some(pos) = positions.get(equipped.owner) {
            return Some(map.xy_idx(pos.x, pos.y) as i32);
        }
    }

    // 也许 creator 有位置?
    if let Some(creator) = creator {
        if let Some(pos) = positions.get(creator) {
            return Some(map.xy_idx(pos.x, pos.y) as i32);
        }
    }

    // 不知道 - 放弃
    None
}
}
然后我们只需要在 event_trigger 中做一个小的更改(在 effects/triggers.rs 中):
#![allow(unused)]
fn main() {
// 线条粒子生成
if let Some(part) = ecs.read_storage::<SpawnParticleLine>().get(entity) {
    ...
}
现在就这样了。如果你现在 cargo run,你可以按 ctrl+1 来电击别人了!
恢复法力
你可能会注意到,你现在实际上永远无法恢复法力。你只能电击几次(默认 4 次),然后就结束了。虽然这非常像第一版《龙与地下城》,但在视频游戏中却没什么乐趣。另一方面,咒语是强大的 - 所以我们不希望成为魔法的劲量兔子太容易!
法力药水
一个好的开始是提供法力药水来恢复你的魔法渴望。在 spawns.json 中:
{
    "name" : "法力药水",
    "renderable": {
        "glyph" : "!",
        "fg" : "#FF00FF",
        "bg" : "#000000",
        "order" : 2
    },
    "consumable" : {
        "effects" : { "provides_mana" : "4" }
    },
    "weight_lbs" : 0.5,
    "base_value" : 50.0,
    "vendor_category" : "alchemy",
    "magic" : { "class" : "common", "naming" : "potion" }
},
并使它们成为丰富的生成物:
{ "name" : "法力药水", "weight" : 7, "min_depth" : 0, "max_depth" : 100 },
我们尚不支持 provides_mana,所以我们需要为其创建一个组件。在 components.rs 中(以及 main.rs 和 saveload_system.rs):
#![allow(unused)]
fn main() {
#[derive(Component, Debug, Serialize, Deserialize, Clone)]
pub struct ProvidesMana {
    pub mana_amount : i32
}
}
在 raws/rawmaster.rs 中,我们将其添加为生成效果:
#![allow(unused)]
fn main() {
macro_rules! apply_effects {
    ( $effects:expr, $eb:expr ) => {
        for effect in $effects.iter() {
        let effect_name = effect.0.as_str();
            match effect_name {
                "provides_healing" => $eb = $eb.with(ProvidesHealing{ heal_amount: effect.1.parse::<i32>().unwrap() }),
                "provides_mana" => $eb = $eb.with(ProvidesMana{ mana_amount: effect.1.parse::<i32>().unwrap() }),
                "ranged" => $eb = $eb.with(Ranged{ range: effect.1.parse::<i32>().unwrap() }),
                "damage" => $eb = $eb.with(InflictsDamage{ damage : effect.1.parse::<i32>().unwrap() }),
                "area_of_effect" => $eb = $eb.with(AreaOfEffect{ radius: effect.1.parse::<i32>().unwrap() }),
                "confusion" => {
                    $eb = $eb.with(Confusion{});
                    $eb = $eb.with(Duration{ turns: effect.1.parse::<i32>().unwrap() });
                }
                "magic_mapping" => $eb = $eb.with(MagicMapper{}),
                "town_portal" => $eb = $eb.with(TownPortal{}),
                "food" => $eb = $eb.with(ProvidesFood{}),
                "single_activation" => $eb = $eb.with(SingleActivation{}),
                "particle_line" => $eb = $eb.with(parse_particle_line(&effect.1)),
                "particle" => $eb = $eb.with(parse_particle(&effect.1)),
                "remove_curse" => $eb = $eb.with(ProvidesRemoveCurse{}),
                "identify" => $eb = $eb.with(ProvidesIdentification{}),
                _ => rltk::console::log(format!("警告:消耗品效果 {} 尚未实现。", effect_name))
            }
        }
    };
}
}
这将创建组件(你现在应该已经习惯了!),所以我们还需要处理使用它的效果。我们将首先在 effects/mod.rs 中创建一个新的 EffectType:
#![allow(unused)]
fn main() {
#[derive(Debug)]
pub enum EffectType {
    Damage { amount : i32 },
    Bloodstain,
    Particle { glyph: rltk::FontCharType, fg : rltk::RGB, bg: rltk::RGB, lifespan: f32 },
    EntityDeath,
    ItemUse { item: Entity },
    SpellUse { spell: Entity },
    WellFed,
    Healing { amount : i32 },
    Mana { amount : i32 },
    Confusion { turns : i32 },
    TriggerFire { trigger: Entity },
    TeleportTo { x:i32, y:i32, depth: i32, player_only : bool },
    AttributeEffect { bonus : AttributeBonus, name : String, duration : i32 }
}
}
我们将它标记为影响实体:
#![allow(unused)]
fn main() {
fn tile_effect_hits_entities(effect: &EffectType) -> bool {
    match effect {
        EffectType::Damage{..} => true,
        EffectType::WellFed => true,
        EffectType::Healing{..} => true,
        EffectType::Mana{..} => true,
        EffectType::Confusion{..} => true,
        EffectType::TeleportTo{..} => true,
        EffectType::AttributeEffect{..} => true,
        _ => false
    }
}
}
并将其包含在我们的 affect_entities 函数中:
#![allow(unused)]
fn main() {
fn affect_entity(ecs: &mut World, effect: &EffectSpawner, target: Entity) {
    match &effect.effect_type {
        EffectType::Damage{..} => damage::inflict_damage(ecs, effect, target),
        EffectType::EntityDeath => damage::death(ecs, effect, target),
        EffectType::Bloodstain{..} => if let Some(pos) = entity_position(ecs, target) { damage::bloodstain(ecs, pos) },
        EffectType::Particle{..} => if let Some(pos) = entity_position(ecs, target) { particles::particle_to_tile(ecs, pos, &effect) },
        EffectType::WellFed => hunger::well_fed(ecs, effect, target),
        EffectType::Healing{..} => damage::heal_damage(ecs, effect, target),
        EffectType::Mana{..} => damage::restore_mana(ecs, effect, target),
        EffectType::Confusion{..} => damage::add_confusion(ecs, effect, target),
        EffectType::TeleportTo{..} => movement::apply_teleport(ecs, effect, target),
        EffectType::AttributeEffect{..} => damage::attribute_effect(ecs, effect, target),
        _ => {}
    }
}
}
在 effects/triggers.rs 中的触发器列表中添加以下内容(紧挨着 Healing 下面):
#![allow(unused)]
fn main() {
// 法力
if let Some(mana) = ecs.read_storage::<ProvidesMana>().get(entity) {
    add_effect(creator, EffectType::Mana{amount: mana.mana_amount}, targets.clone());
    did_something = true;
}
}
最后,我们需要在 effects/damage.rs 中实现 restore_mana:
#![allow(unused)]
fn main() {
pub fn restore_mana(ecs: &mut World, mana: &EffectSpawner, target: Entity) {
    let mut pools = ecs.write_storage::<Pools>();
    if let Some(pool) = pools.get_mut(target) {
        if let EffectType::Mana{amount} = mana.effect_type {
            pool.mana.current = i32::min(pool.mana.max, pool.mana.current + amount);
            add_effect(None,
                EffectType::Particle{
                    glyph: rltk::to_cp437('‼'),
                    fg : rltk::RGB::named(rltk::BLUE),
                    bg : rltk::RGB::named(rltk::BLACK),
                    lifespan: 200.0
                },
                Targets::Single{target}
            );
        }
    }
}
}
这与我们的治疗效果非常相似 - 但使用的是法力而不是生命值。
因此,如果你现在 cargo run,你很有可能找到恢复法力的药水。
随时间恢复法力
如果你远离敌人休息,我们已经支持随时间推移为玩家恢复生命值。对法力做同样的事情是有意义的,但我们希望它慢得多。法力是强大的 - 使用远程 zap,你可以造成大量伤害,风险相对较小(尽管定位仍然是关键,因为受伤的敌人仍然会伤害你)。所以我们希望在玩家休息时恢复他们的法力 - 但非常缓慢。在 player.rs 中,skip_turn 函数处理恢复生命值。让我们扩展治疗部分,使其有时也恢复一些法力:
#![allow(unused)]
fn main() {
if can_heal {
    let mut health_components = ecs.write_storage::<Pools>();
    let pools = health_components.get_mut(*player_entity).unwrap();
    pools.hit_points.current = i32::min(pools.hit_points.current + 1, pools.hit_points.max);
    let mut rng = ecs.fetch_mut::<rltk::RandomNumberGenerator>();
    if rng.roll_dice(1,6)==1 {
        pools.mana.current = i32::min(pools.mana.current + 1, pools.mana.max);
    }
}
}
如果你有资格获得治疗,这会在你休息时提供 1/6 的几率恢复一些法力。
学习咒语
在设计咒语效果方面,天空才是真正的极限。你可以愉快地玩一整夜(我就是这么做的!)。我们将首先进入 spawner.rs 并删除起始咒语 - 你开始时没有任何咒语:
#![allow(unused)]
fn main() {
.with(KnownSpells{ spells : Vec::new() })
}
现在我们将介绍我们的第一本咒语书,并使其成为可生成的宝藏。让我们在 spawns.json 中定义我们的第一本书:
{
    "name" : "魔法入门",
    "renderable": {
        "glyph" : "¶",
        "fg" : "#FF00FF",
        "bg" : "#000000",
        "order" : 2
    },
    "consumable" : {
        "effects" : { "teach_spell" : "Zap" }
    },
    "weight_lbs" : 0.5,
    "base_value" : 50.0,
    "vendor_category" : "alchemy"
},
再一次,其中 90% 已经编写完成。新部分是效果 teach_spells。我们需要一个组件来表示这种效果,所以在 components.rs 中再次(并在 main.rs / saveload_system.rs 中注册):
#![allow(unused)]
fn main() {
#[derive(Component, Debug, Serialize, Deserialize, Clone)]
pub struct TeachesSpell {
    pub spell : String
}
}
现在我们将其添加到 raws/rawmaster.rs 中的效果系统内部:
#![allow(unused)]
fn main() {
"teach_spell" => $eb = $eb.with(TeachesSpell{ spell: effect.1.to_string() }),
}
最后,我们需要将其作为另一种效果集成到我们的 effects/triggers.rs 系统中:
#![allow(unused)]
fn main() {
// 学习咒语
    if let Some(spell) = ecs.read_storage::<TeachesSpell>().get(entity) {
        if let Some(known) = ecs.write_storage::<KnownSpells>().get_mut(creator.unwrap()) {
            if let Some(spell_entity) = crate::raws::find_spell_entity(ecs, &spell.spell) {
                if let Some(spell_info) = ecs.read_storage::<SpellTemplate>().get(spell_entity) {
                    let mut already_known = false;
                    known.spells.iter().for_each(|s| if s.display_name == spell.spell { already_known = true });
                    if !already_known {
                        known.spells.push(KnownSpell{ display_name: spell.spell.clone(), mana_cost : spell_info.mana_cost });
                    }
                }
            }
        }
        did_something = true;
    }
}
这是一个很大的 if let 链,但它是有道理的:我们确保该物品教授咒语,然后我们找到学生的已知咒语列表,然后我们找到咒语的模板 - 如果所有这些都有效,我们检查他们是否已经知道该咒语,如果他们不知道,就学习它。然后我们标记 did_something,以便销毁这本书。
为了测试目的,打开 spawns.json,让我们让咒语书出现在任何地方:
{ "name" : "魔法入门指南", "weight" : 200, "min_depth" : 0, "max_depth" : 100 },
现在 cargo run 该项目,你应该不难找到一本书并学会用 Zap 电击事物!
完成后,记得将 weight 降低到合理的数值。
{ "name" : "魔法入门指南", "weight" : 5, "min_depth" : 0, "max_depth" : 100 },
将所有内容整合在一起 - 毒药
在经历了几个章节来制作通用效果系统的漫长道路之后。在我们回到完成我们游戏的有趣部分(地图和怪物!)之前,最好将所有内容整合在一起 - 并结合一个新的(小的)系统 - 以展示我们所取得的成就。为此,我们将添加两种类型的毒药 - 随时间推移的伤害(DOT)和减速毒液。我们将使其作为一种不幸的药水选择(将来会变得有用!)、攻击卷轴、咒语以及蜘蛛可以施加给受害者的东西。令人惊奇的是,现在我们有了一个统一的系统,这真的不太难!
减速、憎恨和随时间推移的伤害效果
我们将首先创建两个新组件来表示效果。在 components.rs 中(并在 main.rs 和 saveload_system.rs 中注册):
#![allow(unused)]
fn main() {
#[derive(Component, Debug, Serialize, Deserialize, Clone)]
pub struct Slow {
    pub initiative_penalty : f32
}

#[derive(Component, Debug, Serialize, Deserialize, Clone)]
pub struct DamageOverTime {
    pub damage : i32
}
}
接下来,我们将打开 raws/rawmaster.rs 并将它们添加为可加载的效果类型:
#![allow(unused)]
fn main() {
macro_rules! apply_effects {
    ( $effects:expr, $eb:expr ) => {
        for effect in $effects.iter() {
        let effect_name = effect.0.as_str();
            match effect_name {
                "provides_healing" => $eb = $eb.with(ProvidesHealing{ heal_amount: effect.1.parse::<i32>().unwrap() }),
                "provides_mana" => $eb = $eb.with(ProvidesMana{ mana_amount: effect.1.parse::<i32>().unwrap() }),
                "teach_spell" => $eb = $eb.with(TeachesSpell{ spell: effect.1.to_string() }),
                "ranged" => $eb = $eb.with(Ranged{ range: effect.1.parse::<i32>().unwrap() }),
                "damage" => $eb = $eb.with(InflictsDamage{ damage : effect.1.parse::<i32>().unwrap() }),
                "area_of_effect" => $eb = $eb.with(AreaOfEffect{ radius: effect.1.parse::<i32>().unwrap() }),
                "confusion" => {
                    $eb = $eb.with(Confusion{});
                    $eb = $eb.with(Duration{ turns: effect.1.parse::<i32>().unwrap() });
                }
                "magic_mapping" => $eb = $eb.with(MagicMapper{}),
                "town_portal" => $eb = $eb.with(TownPortal{}),
                "food" => $eb = $eb.with(ProvidesFood{}),
                "single_activation" => $eb = $eb.with(SingleActivation{}),
                "particle_line" => $eb = $eb.with(parse_particle_line(&effect.1)),
                "particle" => $eb = $eb.with(parse_particle(&effect.1)),
                "remove_curse" => $eb = $eb.with(ProvidesRemoveCurse{}),
                "identify" => $eb = $eb.with(ProvidesIdentification{}),
                "slow" => $eb = $eb.with(Slow{ initiative_penalty : effect.1.parse::<f32>().unwrap() }),
                "damage_over_time" => $eb = $eb.with( DamageOverTime { damage : effect.1.parse::<i32>().unwrap() } ),
                _ => rltk::console::log(format!("警告:消耗品效果 {} 尚未实现。", effect_name))
            }
        }
    };
}
}
所以现在 Slow 和 DamageOverTime 被识别为各种原始文件条目中的效果,并且可以应用它们的组件。接下来,我们需要教效果系统来应用它。我们将从在 effects/mod.rs 中将它们添加到 EffectType 枚举开始:
#![allow(unused)]
fn main() {
#[derive(Debug)]
pub enum EffectType {
    Damage { amount : i32 },
    Bloodstain,
    Particle { glyph: rltk::FontCharType, fg : rltk::RGB, bg: rltk::RGB, lifespan: f32 },
    EntityDeath,
    ItemUse { item: Entity },
    SpellUse { spell: Entity },
    WellFed,
    Healing { amount : i32 },
    Mana { amount : i32 },
    Confusion { turns : i32 },
    TriggerFire { trigger: Entity },
    TeleportTo { x:i32, y:i32, depth: i32, player_only : bool },
    AttributeEffect { bonus : AttributeBonus, name : String, duration : i32 },
    Slow { initiative_penalty : f32 },
    DamageOverTime { damage : i32 }
}
}
在同一文件中,我们需要指示它们适用于实体:
#![allow(unused)]
fn main() {
fn tile_effect_hits_entities(effect: &EffectType) -> bool {
    match effect {
        EffectType::Damage{..} => true,
        EffectType::WellFed => true,
        EffectType::Healing{..} => true,
        EffectType::Mana{..} => true,
        EffectType::Confusion{..} => true,
        EffectType::TeleportTo{..} => true,
        EffectType::AttributeEffect{..} => true,
        EffectType::Slow{..} => true,
        EffectType::DamageOverTime{..} => true,
        _ => false
    }
}
}
我们还需要 affect_entity 中的路由表来正确地引导它们:
#![allow(unused)]
fn main() {
fn affect_entity(ecs: &mut World, effect: &EffectSpawner, target: Entity) {
    match &effect.effect_type {
        EffectType::Damage{..} => damage::inflict_damage(ecs, effect, target),
        EffectType::EntityDeath => damage::death(ecs, effect, target),
        EffectType::Bloodstain{..} => if let Some(pos) = entity_position(ecs, target) { damage::bloodstain(ecs, pos) },
        EffectType::Particle{..} => if let Some(pos) = entity_position(ecs, target) { particles::particle_to_tile(ecs, pos, &effect) },
        EffectType::WellFed => hunger::well_fed(ecs, effect, target),
        EffectType::Healing{..} => damage::heal_damage(ecs, effect, target),
        EffectType::Mana{..} => damage::restore_mana(ecs, effect, target),
        EffectType::Confusion{..} => damage::add_confusion(ecs, effect, target),
        EffectType::TeleportTo{..} => movement::apply_teleport(ecs, effect, target),
        EffectType::AttributeEffect{..} => damage::attribute_effect(ecs, effect, target),
        EffectType::Slow{..} => damage::slow(ecs, effect, target),
        EffectType::DamageOverTime{..} => damage::damage_over_time(ecs, effect, target),
        _ => {}
    }
}
}
反过来,这要求我们在 effects/damage.rs 中创建两个新函数,以匹配我们刚刚调用的函数:
#![allow(unused)]
fn main() {
pub fn slow(ecs: &mut World, effect: &EffectSpawner, target: Entity) {
    if let EffectType::Slow{initiative_penalty} = &effect.effect_type {
        ecs.create_entity()
            .with(StatusEffect{ target })
            .with(Slow{ initiative_penalty : *initiative_penalty })
            .with(Duration{ turns : 5})
            .with(
                if *initiative_penalty > 0.0 {
                    Name{ name : "减速".to_string() }
                } else {
                    Name{ name : "加速".to_string() }
                }
            )
            .marked::<SimpleMarker<SerializeMe>>()
            .build();
    }
}

pub fn damage_over_time(ecs: &mut World, effect: &EffectSpawner, target: Entity) {
    if let EffectType::DamageOverTime{damage} = &effect.effect_type {
        ecs.create_entity()
            .with(StatusEffect{ target })
            .with(DamageOverTime{ damage : *damage })
            .with(Duration{ turns : 5})
            .with(Name{ name : "持续伤害".to_string() })
            .marked::<SimpleMarker<SerializeMe>>()
            .build();
    }
}
}
你会注意到,这两个都类似于 Confusion - 它们应用状态效果。现在我们需要在 effects/triggers.rs 文件中处理这些效果 - 在 event_trigger 函数中:
#![allow(unused)]
fn main() {
// 减速
if let Some(slow) = ecs.read_storage::<Slow>().get(entity) {
    add_effect(creator, EffectType::Slow{ initiative_penalty : slow.initiative_penalty }, targets.clone());
    did_something = true;
}

// 持续伤害
if let Some(damage) = ecs.read_storage::<DamageOverTime>().get(entity) {
    add_effect(creator, EffectType::DamageOverTime{ damage : damage.damage }, targets.clone());
    did_something = true;
}
}
最后,我们需要让状态效果对受害者产生影响!第一个 Slow 效果在 ai/encumbrance_system.rs 文件中处理是有意义的。在处理属性效果之后,添加:
#![allow(unused)]
fn main() {
// 汇总加速/减速
for (status, slow) in (&statuses, &slowed).join() {
    if to_update.contains_key(&status.target) {
        let totals = to_update.get_mut(&status.target).unwrap();
        totals.initiative += slow.initiative_penalty;
    }
}
}
我们将 DamageOverTime 支持添加到持续时间计时器(它可以是一个单独的系统,但我们已经在正确的时间迭代状态效果 - 所以我们不妨将它们组合起来)。扩展 ai/initiative_system.rs 中的持续时间检查以包含它:
#![allow(unused)]
fn main() {
impl<'a> System<'a> for InitiativeSystem {
    #[allow(clippy::type_complexity)]
    type SystemData = ( WriteStorage<'a, Initiative>,
                        ReadStorage<'a, Position>,
                        WriteStorage<'a, MyTurn>,
                        Entities<'a>,
                        WriteExpect<'a, rltk::RandomNumberGenerator>,
                        ReadStorage<'a, Attributes>,
                        WriteExpect<'a, RunState>,
                        ReadExpect<'a, Entity>,
                        ReadExpect<'a, rltk::Point>,
                        ReadStorage<'a, Pools>,
                        WriteStorage<'a, Duration>,
                        WriteStorage<'a, EquipmentChanged>,
                        ReadStorage<'a, StatusEffect>,
                        ReadStorage<'a, DamageOverTime>
                    );

    fn run(&mut self, data : Self::SystemData) {
        let (mut initiatives, positions, mut turns, entities, mut rng, attributes,
            mut runstate, player, player_pos, pools, mut durations, mut dirty,
            statuses, dots) = data;
...
// 处理持续时间
if *runstate == RunState::AwaitingInput {
    use crate::effects::*;
    for (effect_entity, duration, status) in (&entities, &mut durations, &statuses).join() {
        if entities.is_alive(status.target) {
            duration.turns -= 1;
            if let Some(dot) = dots.get(effect_entity) {
                add_effect(
                    None,
                    EffectType::Damage{ amount : dot.damage },
                    Targets::Single{ target : status.target
                    }
                );
            }
            if duration.turns < 1 {
                dirty.insert(status.target, EquipmentChanged{}).expect("无法插入");
                entities.delete(effect_entity).expect("无法删除");
            }
        }
    }
}
}
这段代码中有一个新概念:is_alive。状态效果可能会比它们的目标寿命更长,所以我们只想在目标仍然是有效实体时应用它们。否则,游戏将崩溃!
仅添加物品
这就是使两种效果起作用所需的一切 - 现在我们只需要将它们添加到一些物品和咒语中。让我们添加三种药水来演示我们刚刚完成的工作:
{ "name" : "毒药药水", "weight" : 100, "min_depth" : 0, "max_depth" : 100 },
{ "name" : "缓慢药水", "weight" : 100, "min_depth" : 0, "max_depth" : 100 },
{ "name" : "急速药水", "weight" : 100, "min_depth" : 0, "max_depth" : 100 },
...
{
    "name" : "毒药药水",
    "renderable": {
        "glyph" : "!",
        "fg" : "#FF00FF",
        "bg" : "#000000",
        "order" : 2
    },
    "consumable" : {
        "effects" : { "damage_over_time" : "2" }
    },
    "weight_lbs" : 0.5,
    "base_value" : 50.0,
    "vendor_category" : "alchemy",
    "magic" : { "class" : "common", "naming" : "potion" }
},

{
    "name" : "缓慢药水",
    "renderable": {
        "glyph" : "!",
        "fg" : "#FF00FF",
        "bg" : "#000000",
        "order" : 2
    },
    "consumable" : {
        "effects" : { "slow" : "2.0" }
    },
    "weight_lbs" : 0.5,
    "base_value" : 50.0,
    "vendor_category" : "alchemy",
    "magic" : { "class" : "common", "naming" : "potion" }
},

{
    "name" : "急速药水",
    "renderable": {
        "glyph" : "!",
        "fg" : "#FF00FF",
        "bg" : "#000000",
        "order" : 2
    },
    "consumable" : {
        "effects" : { "slow" : "-2.0" }
    },
    "weight_lbs" : 0.5,
    "base_value" : 100.0,
    "vendor_category" : "alchemy",
    "magic" : { "class" : "common", "naming" : "potion" }
},
请注意,我们给它们设置了非常高的生成几率 - 一旦我们知道它们可以工作,我们将纠正这一点!如果你现在 cargo run,你会在树林中找到药水 - 它们会像你期望的那样伤害/加速/减慢你的速度。这表明:
- 我们的通用药水命名正确地混淆了新药水。
- 我们的减速/持续伤害效果正在应用于自我使用的物品。
- 我们现在只需将这些效果添加到
spawns.json文件中,就可以使这些效果适用于药水。你甚至可以使用负伤害来获得随时间推移的治疗效果。
现在为了展示该系统,我们还要制作一个 Web Scroll 和一个 Rod of Venom:
{
    "name" : "蛛网卷轴",
    "renderable": {
        "glyph" : ")",
        "fg" : "#FFAAAA",
        "bg" : "#000000",
        "order" : 2
    },
    "consumable" : {
        "effects" : {
            "ranged" : "6",
            "slow" : "10.0",
            "area_of_effect" : "3",
            "particle_line" : "☼;#FFFFFF;200.0"
        }
    },
    "weight_lbs" : 0.5,
    "base_value" : 500.0,
    "vendor_category" : "alchemy",
    "magic" : { "class" : "common", "naming" : "scroll" }
},

{
    "name" : "毒液之杖",
    "renderable": {
        "glyph" : "/",
        "fg" : "#FFAAAA",
        "bg" : "#000000",
        "order" : 2
    },
    "consumable" : {
        "effects" : {
            "ranged" : "6",
            "damage_over_time" : "1",
            "particle_line" : "▓;#00FF00;200.0"
        },
        "charges" : 5
    },
    "weight_lbs" : 0.5,
    "base_value" : 500.0,
    "vendor_category" : "alchemy",
    "magic" : { "class" : "common", "naming" : "Unidentified Rod" }
}
我们将使这些成为常见的生成物,并将药水的生成几率降低到合理的数值:
{ "name" : "毒药药水", "weight" : 3, "min_depth" : 0, "max_depth" : 100 },
{ "name" : "缓慢药水", "weight" : 3, "min_depth" : 0, "max_depth" : 100 },
{ "name" : "急速药水", "weight" : 3, "min_depth" : 0, "max_depth" : 100 },
{ "name" : "蛛网卷轴", "weight" : 2, "min_depth" : 0, "max_depth" : 100 },
{ "name" : "毒液之杖", "weight" : 2, "min_depth" : 0, "max_depth" : 100 },
如果我们现在 cargo run 并找到新的卷轴和法杖,我们可以对毫无戒心的受害者施加毒药和范围效果减速(这基本上就是蛛网!)。再一次,我们证明了该系统非常灵活:
- 你也可以将新效果应用于卷轴和法杖,并且命名系统继续工作。
- 这些效果适用于范围效果和单目标受害者。
为了继续展示我们灵活的效果系统,我们将添加两个咒语 - Venom 和 Web,以及几本可以从中学习的咒语书 - Arachnophilia 101 和 Venom 101。在 spawns.json 的 Spells 部分中,我们可以添加:
{
    "name" : "蛛网",
    "mana_cost" : 2,
    "effects" : {
        "ranged" : "6",
        "slow" : "10",
        "area_of_effect" : "3",
        "particle_line" : "☼;#FFFFFF;400.0"
    }
},

{
    "name" : "毒液",
    "mana_cost" : 2,
    "effects" : {
        "ranged" : "6",
        "damage_over_time" : "4",
        "particle_line" : "▓;#00FF00;400.0"
    }
}
我们将像魔法入门书一样添加这本书:
{
    "name" : "Arachnophilia 101",
    "renderable": {
        "glyph" : "¶",
        "fg" : "#FF00FF",
        "bg" : "#000000",
        "order" : 2
    },
    "consumable" : {
        "effects" : { "teach_spell" : "Web" }
    },
    "weight_lbs" : 0.5,
    "base_value" : 50.0,
    "vendor_category" : "alchemy"
},

{
    "name" : "Venom 101",
    "renderable": {
        "glyph" : "¶",
        "fg" : "#FF00FF",
        "bg" : "#000000",
        "order" : 2
    },
    "consumable" : {
        "effects" : { "teach_spell" : "Venom" }
    },
    "weight_lbs" : 0.5,
    "base_value" : 50.0,
    "vendor_category" : "alchemy"
    },
我们将修复生成概率:
{ "name" : "蛛网卷轴", "weight" : 2, "min_depth" : 0, "max_depth" : 100 },
{ "name" : "毒液之杖", "weight" : 2, "min_depth" : 0, "max_depth" : 100 },
{ "name" : "Arachnophilia 101", "weight" : 100, "min_depth" : 0, "max_depth" : 100 },
{ "name" : "Venom 101", "weight" : 100, "min_depth" : 0, "max_depth" : 100 },
再次,如果你 cargo run 该项目 - 你可以四处奔波学习这些咒语 - 并将它们施加在你的敌人身上!我们验证了:
- 我们的咒语学习系统是灵活的。
- 效果系统继续适当地应用这些效果,这次是通过施法。
更多效果触发器
我们在本章部分进行的测试向我们展示了我们构建的功能的强大之处:单个系统可以为物品和咒语提供效果,支持多种目标类型和附加效果。这真的很棒,并展示了你可以使用 ECS(以及顶部的消息传递系统)做些什么。似乎为了真正为系统锦上添花,还有两种情况下应该触发效果:
- 作为武器击中后的“proc”效果(所以“毒液匕首”可能会毒害目标)。
- 作为敌人的特殊能力(我向你保证我们快要讲到那里了!虽然还不太快……)
伤害 Proc
让我们从武器上的“proc”效果开始。考虑到这一点,武器 proc 可以影响目标或施法者(例如,你可能有一把剑,在你击中某些东西时会治疗你 - 或者你可能想用你的超锋利的剑对目标施加随时间推移的伤害)。它们不应该总是 proc - 所以需要有一个机会(可能是 100%)让它发生。并且它们需要具有效果,这可以方便地使用我们辛苦定义的效应系统。让我们在 spawns.json 中将此组合成 毒液匕首:
{
    "name" : "毒液匕首",
    "renderable": {
        "glyph" : "/",
        "fg" : "#FFAAAA",
        "bg" : "#000000",
        "order" : 2
    },
    "weapon" : {
        "range" : "melee",
        "attribute" : "Quickness",
        "base_damage" : "1d4+1",
        "hit_bonus" : 1,
        "proc_chance" : 0.5,
        "proc_target" : "Target",
        "proc_effects" : { "damage_over_time" : "2" }
    },
    "weight_lbs" : 1.0,
    "base_value" : 2.0,
    "initiative_penalty" : -1,
    "vendor_category" : "weapon",
    "magic" : { "class" : "common", "naming" : "Unidentified Dagger" }
},
为了制作这个,我复制/粘贴了一个基本的 Dagger 并给它添加了命中/伤害/先攻奖励。然后我添加了一些新字段:proc_chance,proc_target 和 proc_effects。效果系统可以在一点帮助下处理效果。首先,我们需要扩展 raws/item_structs.rs 中的“weapon”结构以处理额外的字段:
#![allow(unused)]
fn main() {
#[derive(Deserialize, Debug)]
pub struct Weapon {
    pub range: String,
    pub attribute: String,
    pub base_damage: String,
    pub hit_bonus: i32,
    pub proc_chance : Option<f32>,
    pub proc_target : Option<String>,
    pub proc_effects : Option<HashMap<String, String>>
}
}
现在,我们将这些字段添加到 MeleeWeapon 组件类型中(在 components.rs 中):
#![allow(unused)]
fn main() {
#[derive(Component, Serialize, Deserialize, Clone)]
pub struct MeleeWeapon {
    pub attribute : WeaponAttribute,
    pub damage_n_dice : i32,
    pub damage_die_type : i32,
    pub damage_bonus : i32,
    pub hit_bonus : i32,
    pub proc_chance : Option<f32>,
    pub proc_target : Option<String>,
}
}
当我们读取关于武器的信息时,我们也需要实例化这些数据。我们可以相当容易地扩展 raws/rawmaster.rs 中 spawn_named_item 的 weapon 部分:
#![allow(unused)]
fn main() {
if let Some(weapon) = &item_template.weapon {
    eb = eb.with(Equippable{ slot: EquipmentSlot::Melee });
    let (n_dice, die_type, bonus) = parse_dice_string(&weapon.base_damage);
    let mut wpn = MeleeWeapon{
        attribute : WeaponAttribute::Might,
        damage_n_dice : n_dice,
        damage_die_type : die_type,
        damage_bonus : bonus,
        hit_bonus : weapon.hit_bonus,
        proc_chance : weapon.proc_chance,
        proc_target : weapon.proc_target.clone()
    };
    match weapon.attribute.as_str() {
        "Quickness" => wpn.attribute = WeaponAttribute::Quickness,
        _ => wpn.attribute = WeaponAttribute::Might
    }
    eb = eb.with(wpn);
    if let Some(proc_effects) =& weapon.proc_effects {
        apply_effects!(proc_effects, eb);
    }
}
}
现在我们需要让 proc 效果发生(或者不发生,它是随机的!)。我们在 melee_combat_system.rs 中还有一些工作要做。首先,当我们生成默认武器(徒手)时,我们需要新字段:
#![allow(unused)]
fn main() {
// 定义基本的徒手攻击 - 如果装备了武器,则会被下面的挥舞检查覆盖
let mut weapon_info = MeleeWeapon{
    attribute : WeaponAttribute::Might,
    hit_bonus : 0,
    damage_n_dice : 1,
    damage_die_type : 4,
    damage_bonus : 0,
    proc_chance : None,
    proc_target : None
};
}
在我们找到挥舞的武器的地方,我们还需要存储实体(以便我们可以访问效果组件):
#![allow(unused)]
fn main() {
let mut weapon_entity : Option<Entity> = None;
for (weaponentity,wielded,melee) in (&entities, &equipped_items, &meleeweapons).join() {
    if wielded.owner == entity && wielded.slot == EquipmentSlot::Melee {
        weapon_info = melee.clone();
        weapon_entity = Some(weaponentity);
    }
}
}
然后,在成功命中的 add_effect 之后,我们添加武器“proccing”:
#![allow(unused)]
fn main() {
log.entries.push(format!("{} 击中 {}, 造成 {} hp 伤害。", &name.name, &target_name.name, damage));

// Proc 效果
if let Some(chance) = &weapon_info.proc_chance {
    if rng.roll_dice(1, 100) <= (chance * 100.0) as i32 {
        let effect_target = if weapon_info.proc_target.unwrap() == "Self" {
            Targets::Single{ target: entity }
        } else {
            Targets::Single { target : wants_melee.target }
        };
        add_effect(
            Some(entity),
            EffectType::ItemUse{ item: weapon_entity.unwrap() },
            effect_target
        )
    }
}
}
这非常简单:它掷一个 100 面骰子,并使用分数“proc 几率”作为其发生的百分比几率。如果它确实发生了,它会根据 proc 效果将效果目标设置为挥舞者或目标,并调用 add_effect 系统来启动它。
记住将 毒液匕首 放入你的生成表:
{ "name" : "毒液匕首", "weight" : 100, "min_depth" : 0, "max_depth" : 100 },
如果你现在 cargo run,你可以找到一把匕首 - 有时你可以毒害你的受害者。再次,我们在这里真正展示了 ECS/消息传递系统的强大功能:通过一点扩展,我们的整个效果系统也适用于武器 proc!
敌人施法/能力使用
除了魔法武器(谁挥舞它们都会受益)之外,效果系统现在非常不对称。怪物无法将大多数这些效果发送回给你。在 roguelike 游戏中,怪物使用与玩家相同的规则是很常见的(这实际上是我们尝试实现的 柏林解释 中的一个低价值目标)。我们不会尝试让怪物使用它们可能生成的任何物品(暂且!),但我们将赋予它们施放咒语的能力 - 作为特殊攻击。让我们赋予 大型蜘蛛 使用我们在上面定义的 Web 咒语来减慢你的速度的能力。像往常一样,我们将从 JSON 文件开始,确定它应该是什么样子:
{
    "name" : "大型蜘蛛",
    "level" : 2,
    "attributes" : {},
    "renderable": {
        "glyph" : "s",
        "fg" : "#FF0000",
        "bg" : "#000000",
        "order" : 1
    },
    "blocks_tile" : true,
    "vision_range" : 6,
    "movement" : "static",
    "natural" : {
        "armor_class" : 12,
        "attacks" : [
            { "name" : "咬", "hit_bonus" : 1, "damage" : "1d12" }
        ]
    },
    "abilities" : [
        { "spell" : "Web", "chance" : 0.2, "range" : 6.0, "min_range" : 3.0 }
    ],
    "faction" : "食肉动物"
},
这与之前的 大型蜘蛛 相同,但我们添加了一个 abilities 部分,列出了它有 20% 的几率决定制作蛛网。我们需要扩展 raws/mob_structs.rs 以支持这一点:
#![allow(unused)]
fn main() {
#[derive(Deserialize, Debug)]
pub struct Mob {
    pub name : String,
    pub renderable : Option<Renderable>,
    pub blocks_tile : bool,
    pub vision_range : i32,
    pub movement : String,
    pub quips : Option<Vec<String>>,
    pub attributes : MobAttributes,
    pub skills : Option<HashMap<String, i32>>,
    pub level : Option<i32>,
    pub hp : Option<i32>,
    pub mana : Option<i32>,
    pub equipped : Option<Vec<String>>,
    pub natural : Option<MobNatural>,
    pub loot_table : Option<String>,
    pub light : Option<MobLight>,
    pub faction : Option<String>,
    pub gold : Option<String>,
    pub vendor : Option<Vec<String>>,
    pub abilities : Option<Vec<MobAbility>>
}

#[derive(Deserialize, Debug)]
pub struct MobAbility {
    pub spell : String,
    pub chance : f32,
    pub range : f32,
    pub min_range : f32
}
}
让我们创建一个新组件来保存怪物的这些数据(以及任何其他具有特殊能力的实体)。在 components.rs 中(以及 main.rs 和 saveload_system.rs 中的常用注册;你只需要注册组件 SpecialAbilities):
#![allow(unused)]
fn main() {
#[derive(Debug, Serialize, Deserialize, Clone)]
pub struct SpecialAbility {
    pub spell : String,
    pub chance : f32,
    pub range : f32,
    pub min_range : f32
}

#[derive(Component, Debug, Serialize, Deserialize, Clone)]
pub struct SpecialAbilities {
    pub abilities : Vec<SpecialAbility>
}
}
现在我们转到 raws/rawmaster.rs 以在 spawn_named_mob 函数中附加组件。在 build() 调用之前,我们可以添加特殊能力:
#![allow(unused)]
fn main() {
if let Some(ability_list) = &mob_template.abilities {
    let mut a = SpecialAbilities { abilities : Vec::new() };
    for ability in ability_list.iter() {
        a.abilities.push(
            SpecialAbility{
                chance : ability.chance,
                spell : ability.spell.clone(),
                range : ability.range,
                min_range : ability.min_range
            }
        );
    }
    eb = eb.with(a);
}
}
现在我们已经创建了组件,我们应该给怪物一个机会来使用它们新发现的能力。可以轻松修改 visible_ai_system 以实现此目的:
#![allow(unused)]
fn main() {
use specs::prelude::*;
use crate::{MyTurn, Faction, Position, Map, raws::Reaction, Viewshed, WantsToFlee,
    WantsToApproach, Chasing, SpecialAbilities, WantsToCastSpell, Name, SpellTemplate};

pub struct VisibleAI {}

impl<'a> System<'a> for VisibleAI {
    #[allow(clippy::type_complexity)]
    type SystemData = (
        ReadStorage<'a, MyTurn>,
        ReadStorage<'a, Faction>,
        ReadStorage<'a, Position>,
        ReadExpect<'a, Map>,
        WriteStorage<'a, WantsToApproach>,
        WriteStorage<'a, WantsToFlee>,
        Entities<'a>,
        ReadExpect<'a, Entity>,
        ReadStorage<'a, Viewshed>,
        WriteStorage<'a, Chasing>,
        ReadStorage<'a, SpecialAbilities>,
        WriteExpect<'a, rltk::RandomNumberGenerator>,
        WriteStorage<'a, WantsToCastSpell>,
        ReadStorage<'a, Name>,
        ReadStorage<'a, SpellTemplate>
    );

    fn run(&mut self, data : Self::SystemData) {
        let (turns, factions, positions, map, mut want_approach, mut want_flee, entities, player,
            viewsheds, mut chasing, abilities, mut rng, mut casting, names, spells) = data;

        for (entity, _turn, my_faction, pos, viewshed) in (&entities, &turns, &factions, &positions, &viewsheds).join() {
            if entity != *player {
                let my_idx = map.xy_idx(pos.x, pos.y);
                let mut reactions : Vec<(usize, Reaction, Entity)> = Vec::new();
                let mut flee : Vec<usize> = Vec::new();
                for visible_tile in viewshed.visible_tiles.iter() {
                    let idx = map.xy_idx(visible_tile.x, visible_tile.y);
                    if my_idx != idx {
                        evaluate(idx, &map, &factions, &my_faction.name, &mut reactions);
                    }
                }

                let mut done = false;
                for reaction in reactions.iter() {
                    match reaction.1 {
                        Reaction::Attack => {
                            if let Some(abilities) = abilities.get(entity) {
                                let range = rltk::DistanceAlg::Pythagoras.distance2d(
                                    rltk::Point::new(pos.x, pos.y),
                                    rltk::Point::new(reaction.0 as i32 % map.width, reaction.0 as i32 / map.width)
                                );
                                for ability in abilities.abilities.iter() {
                                    if range >= ability.min_range && range <= ability.range &&
                                        rng.roll_dice(1,100) >= (ability.chance * 100.0) as i32
                                    {
                                        use crate::raws::find_spell_entity_by_name;
                                        casting.insert(
                                            entity,
                                            WantsToCastSpell{
                                                spell : find_spell_entity_by_name(&ability.spell, &names, &spells, &entities).unwrap(),
                                                target : Some(rltk::Point::new(reaction.0 as i32 % map.width, reaction.0 as i32 / map.width))}
                                        ).expect("无法插入");
                                        done = true;
                                    }
                                }
                            }

                            if !done {
                                want_approach.insert(entity, WantsToApproach{ idx: reaction.0 as i32 }).expect("无法插入");
                                chasing.insert(entity, Chasing{ target: reaction.2}).expect("无法插入");
                                done = true;
                            }
                        }
                        Reaction::Flee => {
                            flee.push(reaction.0);
                        }
                        _ => {}
                    }
                }

                if !done && !flee.is_empty() {
                    want_flee.insert(entity, WantsToFlee{ indices : flee }).expect("无法插入");
                }
            }
        }
    }
}
}
这里有一个技巧:find_spell_entity_by_name;因为我们是在系统内部,所以我们不能只传递 World 参数。所以我向 raws/rawmaster.rs 添加了一个系统内版本:
#![allow(unused)]
fn main() {
pub fn find_spell_entity_by_name(
    name : &str,
    names : &ReadStorage::<Name>,
    spell_templates : &ReadStorage::<SpellTemplate>,
    entities : &Entities) -> Option<Entity>
{
    for (entity, sname, _template) in (entities, names, spell_templates).join() {
        if name == sname.name {
            return Some(entity);
        }
    }
    None
}
}
一旦到位,你就可以 cargo run - 蜘蛛可以用蛛网击中你!
总结
这是物品效果迷你系列的最后一章:我们已经完成了我们的目标!现在有一个用于定义效果的单一管道,它们可以通过以下方式应用:
- 施放咒语(你可以从书中学习)
- 使用卷轴
- 饮用法力药水
- 武器“proc”效果命中时
- 怪物特殊能力
这些效果可以:
- 瞄准单个图块,
- 瞄准单个实体,
- 瞄准范围效果,
- 瞄准多个实体
效果也可以链接起来,允许你指定视觉效果和其他在效果触发时发生的事情。我们只需付出相对较小的努力就可以为生物添加新效果,并且只需少量工作即可在需要时添加新效果。这将有助于即将到来的章节,其中将以一条在其巢穴中挥舞酸性吐息武器的龙为特色。
...
本章的源代码可以在这里找到
在你的浏览器中使用 web assembly 运行本章的示例(需要 WebGL2)
版权所有 (C) 2019, Herbert Wolverson。